
Air roots are an essential part of the orchid’s anatomy; they help to absorb moisture and nutrients from the air, improving their health and keeping them thriving. The roots that grow in the soil are mainly used for stabilization, while those in the air serve to nourish the plant.
Orchids with air roots tend to have a greater capacity for absorption and are more tolerant to different conditions.
When dealing with an orchid that has air roots, the best thing to do is pot it in a larger container. This will give it enough room for its roots to spread out and absorb moisture from the air.
Be sure to use a potting mix specifically designed for orchids and make sure to keep the soil moist but not waterlogged.
If you’re looking to repot an orchid with air roots, follow the same steps as above, but be extra careful when handling the air roots. Since they are more fragile than regular roots, try to avoid breaking them off. What to do with orchid air roots?
What Are Orchid Air Roots?
Air roots are an essential part of an orchid’s health and wellbeing, allowing them to obtain necessary nutrients and moisture while they grow.
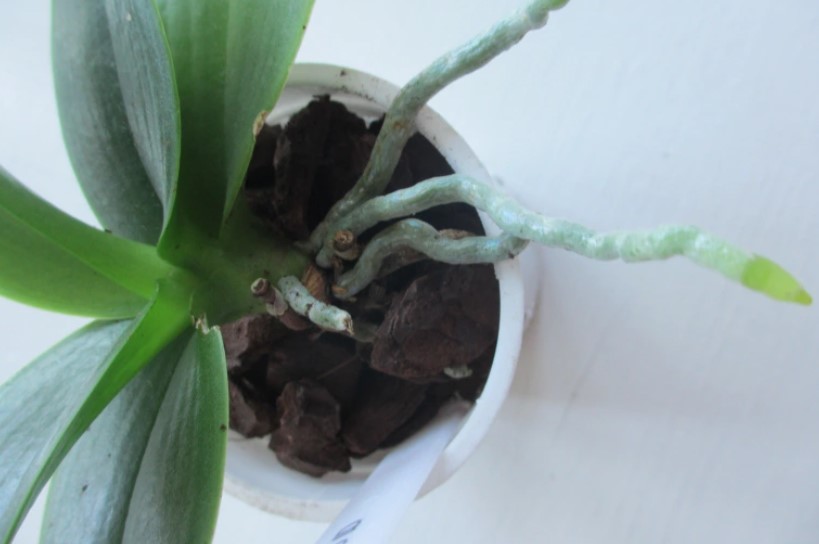
These air roots look quite different from the downward-growing roots that are more commonly seen. Air roots appear more like thin tendrils, often much longer than other normal roots.
They can sometimes be seen extending out of the orchid’s potting medium, clinging to a piece of bark or climbing onto the side of the pot.
Air roots are actually a specialized type of root that helps epiphyte orchids – also known as air plants – survive in their natural environment.
These types of orchids, like Phalaenopsis, do not grow in the ground. Instead, these orchids attach themselves to tree branches, using their roots to absorb nutrients and moisture from the air around them.
In order for these plants to effectively survive in this environment, they need to have more specialized roots that can grab onto surfaces and reach out into. These are called aerial roots.
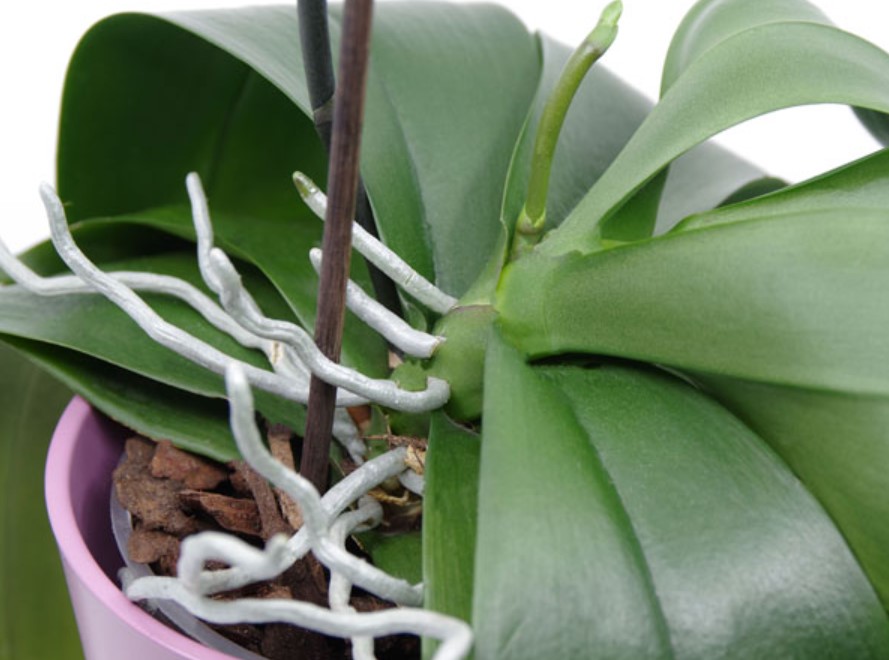
Orchid Roots Growing Out of Pot
Orchid roots that grow out of the pot are a sign that your orchid needs to be repotted. This happens when the existing potting medium is no longer able to provide the necessary nutrients for the orchid and they are forced to look for alternative sources of sustenance.
Orchids usually do this by sending out aerial roots, which are thinner than normal roots and are able to absorb more moisture from the air. If you notice that your orchid is sending out a lot of aerial roots, then it may be time to repot it in fresh potting medium.
However, before doing so, you should check to see if any of the existing roots in the pot are still healthy and receiving adequate nutrition. If they are, then it may not be necessary to repot the orchid.
Additionally, consider how long it has been since your Orchid was last repotted – if you recently performed this task, then you might want to hold off on another one for a while. Repotting too often can disrupt the Orchid’s development and lead to more problems in the long run.
In conclusion, Orchid roots that grow out of the pot can be a sign that your Orchid needs to be repotted, but it is important to check the existing roots before doing so. Additionally, take into account how recently you last repotted the Orchid.
This may include easing some roots through additional holes (as in an orchid pot).
When to Repot an Orchid
Repotting an orchid is important and should be done on a regular basis. When repotting, it is best to do so every one to two years, even if the orchid appears to be healthy. This will help prevent the growing material from breaking down too quickly, as well as give your orchid more room to grow.

When repotting, check the container to ensure it is not too small and that the growing medium has not broken down more quickly than expected. You should also take a look at your orchid’s roots—if they are tightly wrapped around the base of the pot, this is a sign that you need to repot them soon.
How to Repot an Orchid With Air Roots
Repotting an orchid with air roots is a slightly more delicate procedure than repotting other types of orchid. The roots of an air root orchid are much finer and more fragile, so extra care needs to be taken when handling them. Here’s how to repot an orchid with air roots:
1. Carefully remove the orchid from its pot. If your orchid is large, you can tip the container on its side and gently slide it out. Otherwise, you can turn the entire container upside down.
2. Remove the old potting medium from the container, and carefully shake off any soil that is still clinging to the roots.
3. Soak the roots in lukewarm water for about 10-15 minutes to hydrate them and make them easier to handle. Try to keep the water off of the crown, as this can cause unnecessary stress on the plant.
4. Choose a new pot with adequate drainage holes and fill it with a light, well-draining potting mix such as bark or perlite. The roots of an air root orchid do not need to be buried in the soil, so you can simply place them on top of the potting mix.
5. Place the orchid back into its new pot, and water thoroughly to settle the soil.
6. Place your newly repotted orchid in a well-lit location, but be sure to protect it from direct sunlight as this can cause sunburn or stress on the plant.
Trimming Orchid Air Roots
Orchid air roots play an essential role in the plant’s survival and must not be trimmed unless absolutely necessary. Air roots are responsible for drawing crucial nutrients and moisture from the air, which can help to keep the orchid healthy and flourishing.
Trimming healthy air roots can have negative consequences for the orchid, so it is important to only trim air roots if they are clearly dead or damaged.
It is important to note that air roots tend to look more dried-out than expected, so just because an root looks a bit dry does not mean it is dead and should be trimmed. If you mist an air root that appears dry, the root should perk up and show signs of life.
Trimming orchid air roots should only be done if absolutely necessary, and it must be done with great care. Trimmed roots must never be pulled off; instead, they should be cut with scissors to avoid damaging the base of the root.
Soaking Orchid Air Roots Before Repotting
When repotting an orchid, one of the key steps is to soak its air roots in lukewarm water for 10-15 minutes. Soaking helps to remove any residual old growing medium and residue from the roots, making it easier to separate them into two types – air roots and soil roots.
During this time, the air roots will soften and become more pliable, making them easier to handle.
When the air roots are finished soaking, be sure to carefully separate them from the soil roots for repotting. Soaking in water does not harm the air roots, so you can be sure that your orchid will remain healthy and happy during this process.
Roots Inside or Outside of the Soil
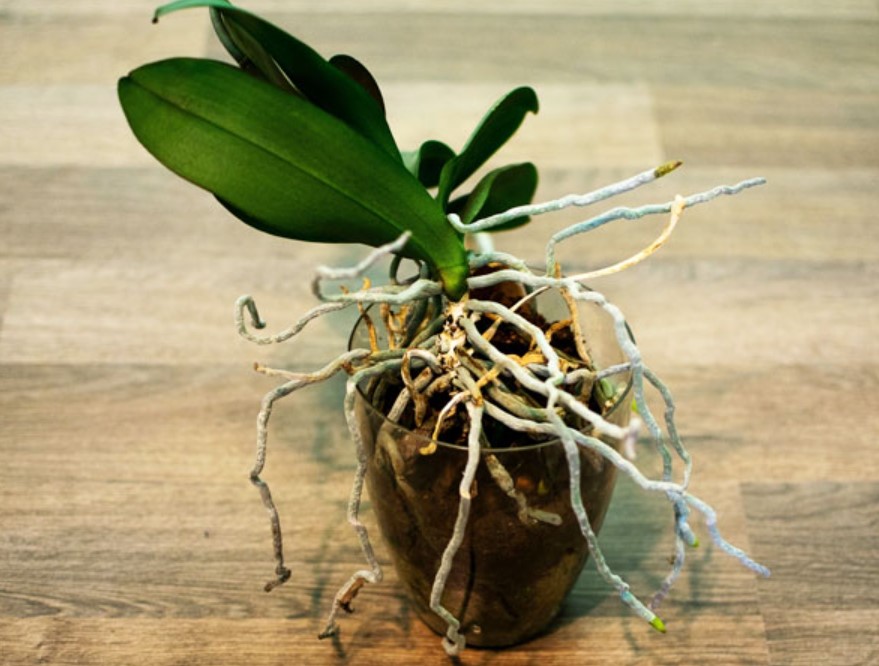
Air roots on orchids look unique and can seem alarming, however, as long as the roots are healthy, they are actually beneficial for your orchid’s survival. Roots that grow outside of the soil are typical among epiphyte orchids found in the wild, which means these plants don’t need to rely on soil for their nutrient and moisture needs.
It also allows the plant to access a wider range of nutrients than if they were rooted in the soil, resulting in healthier roots.
In some cases, air roots can be crucial when orchids suffer from root rot below the soil line. If you’ve removed all air roots from the orchid, chances are it won’t survive. Keeping a few air roots intact in the event of root rot can be helpful for the orchid’s survival.
This is why understanding whether your orchid needs to have its roots inside or outside of the soil is important for providing the best care possible.
Caring for Damaged Orchid Aerial Roots
Caring for damaged orchid aerial roots is relatively simple and straightforward. When an aerial root has been damaged, use sterilized scissors to make a clean break if needed. After the initial cut, the process varies depending on how you want to proceed.
For those who want to apply a solution, 3% hydrogen peroxide can be applied to the open area. This should not cause any further damage to the root and will help reduce bacterial or fungal infections that can occur in open wounds. After application, allow the orchid to air dry on its own.
How to Repot an Orchid With Aerial Roots
Repotting an orchid with aerial roots is a relatively simple process that can help bring new life and health to your plant.

The best time to repot is during the active growth phase between late spring and early summer, as this is when the orchid develops more aerial roots which will make it easier to adapt to its new pot.
1: Remove the Orchid From Its Pot
When you are ready to remove the orchid from its pot, make sure that you have all the supplies you need within reach. This includes a pair of garden scissors or pruning shears, a new pot and potting medium, and some orchid fertilizer.
Before taking out your orchid, it is important to give it some water and wait for the excess moisture to drain out. This will help loosen up the roots, making it easier to remove from its container.
2: Remove the Old Potting Medium
It is important to remove the old potting mix from the roots of a plant when transferring it to a new home. This is because the removal of the old medium ensures that your plant has the best possible chance of surviving in its new environment. To do this, begin by gently shaking the roots so that any chunks of bark or sphagnum moss may fall off.
Once the majority of the old potting medium is removed, you can repot your new plant in a fresh pot with nutrient-rich soil. By removing the old potting medium and providing your plant with a proper environment, you can ensure that it will continue to thrive in its new home.
3: Rinse & Soak the Orchid Roots
When taking care of an orchid, it is important to rinse and soak the roots in warm water. Rinse all the aerial roots and growing roots at the base with warm water to make them flexible, but do not let water enter the crown as it can lead to crown rot.
If the crown appears dry, use some tissue paper to help moisten it. If stubborn rooting medium pieces are stuck, you can soak the roots in warm water for up to 20-minutes. This will ensure that all the medium is off the roots and help your orchid thrive.
Remember that when rinsing and soaking orchids, use only lukewarm water and no other products, as this can harm the roots. Rinse and soak carefully to ensure your orchid’s optimal health.
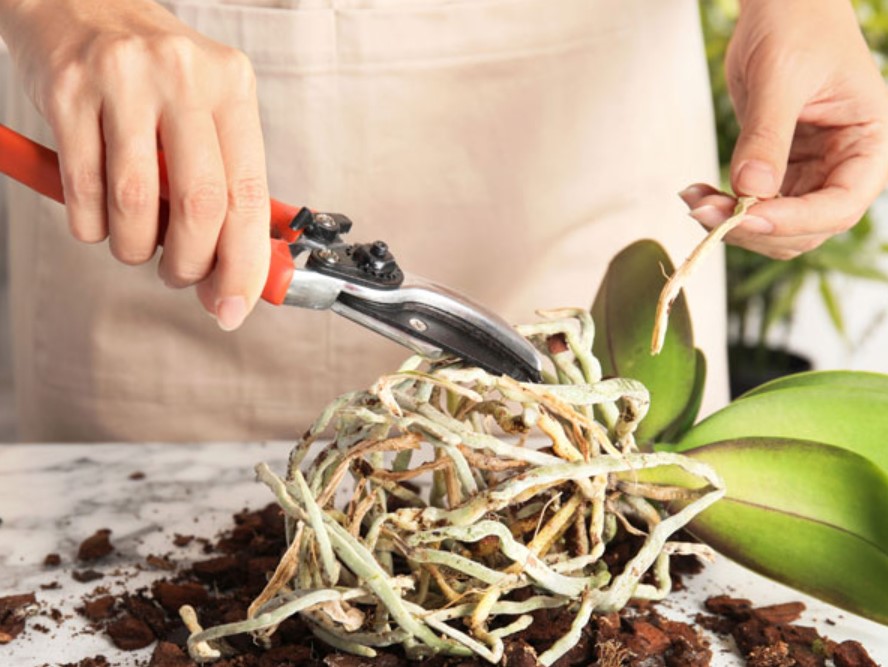
4: Cut Dead & Rotting Roots
The first step to properly caring for your orchid is to remove dead or rotting roots. Doing this will help ensure that the remaining healthy air roots can get the necessary oxygen they need to continue flourishing. Cut off any dry, mushy, or blackened roots with sterilized scissors for optimal results.
It’s important to note that poor root health can be a sign of overwatering and that repotting may have been necessary earlier. Cut off the unhealthy roots to help improve the health of your orchid and make sure you use proper watering techniques in the future.
Because of soaking, you can see which are the healthy roots and which needs to be removed with a sterilized cutter or scissor.
By removing the dead and rotting roots, you can help ensure that your orchid has all the resources it needs to grow and thrive.
5: Sterilize Orchid Roots
Sterilizing orchid roots is an important step in the proper care and maintenance of orchids. This can be achieved most effectively with 3% hydrogen peroxide.
When sprayed on the roots, it helps to remove any fungi, pests, or bacteria that may be present. This also serves to reduce the risk of infection or disease when you transplant your plants.
Sterilizing the roots with 3% hydrogen peroxide is an optional step, but one that can greatly benefit your orchid in the long run. Make sure to follow all safety precautions and instructions when using hydrogen peroxide. Doing this will help to keep your orchids healthy.
6: Repot the Orchid Plant and Water
Now that your orchids are disinfected, it is essential to properly repot the plant in order to provide an adequate home for it. Repotting an orchid requires a few materials and steps, but if done correctly can help ensure the longevity of the plant.
The first step is to prepare the pot or container for the orchid. If you are using an old pot, it should be disinfected before use. If you are purchasing a new one, make sure to buy one that is snug for the orchid with room for two inches larger if not using the old pot.
Answers on questions:
Can you put orchid air roots in soil?
Yes, you can put orchid air roots in soil. When repotting your orchid, it is important to use a pot with a diameter that is at least 20% wider than the previous one. This will ensure that your orchid still has enough room to grow. To cover the air roots, specialized orchid potting soil should be used instead of regular potting soil, as the latter is too dense for orchids. After thoroughly cleaning the root system, make sure to place the air roots in the ground before covering it up with potting soil. As you repot your orchid, take care not to compact the soil excessively and leave enough room for water drainage.
Can you grow an orchid from an aerial root?
Yes, you can grow an orchid from an aerial root! Although it may seem intimidating, this process is actually quite simple and straightforward. All you need to do is carefully trim one of the aerial roots from your existing orchid plant and place it in a small pot with moist soil. Make sure the cutting has at least two nodes on it, which are the small bumps or buds on the root. Once planted, provide your cutting with moderate light and keep the soil moist but not soggy. With patience, you will eventually see new growth as the aerial root takes to its new home and starts to sprout a brand-new orchid plant!
Should you put orchid air roots in water?
It is important to soak orchid air roots in lukewarm water for 10-15 minutes prior to repotting, just like with other types of roots. Soaking the roots helps to clean them off, getting rid of any residue or leftover bits of the old growing medium clinging to them. This is a key step in a successful repotting, so it is advised to take the time to soak orchid air roots in water before getting started. Read also…
Should I bury the air roots on my orchid?
No, you should not bury the air roots of your orchid. These roots are meant to absorb moisture and nutrients from the air, so burying them could harm the plant. Instead, leave them exposed to the air and mist them occasionally to keep them hydrated.
Why is my orchid growing so many air roots?
Orchids are epiphytic plants, which means they naturally grow on other plants or surfaces, such as tree branches or rocks. Air roots, or aerial roots, are a common adaptation of epiphytic orchids to absorb moisture and nutrients from the air.
Can you put orchid aerial roots in water?
Yes, you can put orchid aerial roots in water for a short period of time to hydrate them, but it’s not recommended to keep them submerged in water for a long time as it may cause root rot. It’s best to mist the roots with water regularly or soak them for a few minutes and then let them dry out before placing them back in their pot or mounting.
Can you bury aerial roots?
No, it’s not recommended to bury orchid aerial roots because they need to absorb moisture and nutrients from the air. If you bury the aerial roots, they may not function properly and could potentially harm the plant. It’s best to leave them exposed to the air and mist them occasionally to keep them hydrated.
How do you make an orchid grow a new spike?
To make an orchid grow a new spike, provide it with adequate light, proper watering, regular fertilization, consistent temperature and humidity, and, if applicable, a rest period.
What is the difference between an orchid spike and an orchid root?
An orchid spike is a long, slender stem that produces flowers, while an orchid root is a thicker, more textured structure that absorbs water and nutrients from the growing medium. Spikes emerge from the base of the plant or from between the leaves, while roots grow from the base of the plant and extend downward or outward from the potting mix.
How do I encourage my orchid to flower?
To encourage an orchid to flower, you should provide it with adequate light, proper watering, regular fertilization, consistent temperature and humidity, and, if applicable, a rest period. Additionally, some orchids require a temperature drop at night to stimulate flower production. Be patient, as some orchids may take several months to produce blooms, and avoid moving or disturbing the plant too much as it can cause stress and delay flowering.